
Who Is Responsible for Identification
There are 3 main methods for organizing identification:
- Installing special equipment (a router or proxy server) in the establishment’s Wi-Fi network. This method is most commonly used by hotel owners, where a guest is identified on the network using their room number, which is linked to their passport details.
- Using a ready-made solution from an intermediary company that provides equipment and identification services by phone number. This method can be used by owners of small cafes and restaurants, but has scalability limitations and requires a separate contract and monthly service fee.
- Identification services provided by the telecom operator with whom the internet access contract is concluded. This is the most universal and accessible option, as it requires no additional equipment costs, can be billed under the main internet access contract, and has no limits on the number of free Wi-Fi subscribers.
Identification by Phone Number
This method of identification is the most widespread.
The sequence of actions for a user to access the free Wi-Fi network is as follows:
- The subscriber connects to the establishment’s Wi-Fi network.
- A welcome page from the establishment appears, informing the subscriber that they need to open a browser and identify themselves (on some devices, such as the iPhone, identification directly from the welcome page does not save cookies).
- In the browser, when navigating to any URL, the subscriber is redirected to the identification page.
- The subscriber enters their phone number and requests an access code.
- The access code is sent to the entered phone number via SMS.
- The subscriber enters the received access code on the identification page.
- A session cookie is recorded on the subscriber’s device and stored for 24 hours (this is necessary to allow re-access to the network without re-identification), and the subscriber is redirected to the URL they originally requested.
The establishment owner only needs to install and configure the Wi-Fi equipment, connect it to the telecom operator’s line, and pay for the chosen pricing plan. The user identification process takes place on the telecom operator’s equipment. Let’s walk through how this works using the Stingray system from VAS Experts as an example.
Operator Identification Scheme by Phone Number
In addition to standard equipment for providing internet access to subscribers (switches, routers, border router, Wi-Fi access points), the operator must have:
- The Stingray system;
- A DHCP server for centralized IP address assignment to subscribers (on the same network as the DPI), capable of calling a shell script when a new IP address is issued;
- A virtual machine with an installed Apache web server (httpd) and a statistics and reporting module (nfsen);
- Access to an SMS sending service;
- NAT to reduce the number of IPv4 addresses used, with a translation log recording IP↔IP and PORT (optional);
- Radius for network authentication by subscriber identifier (optional).
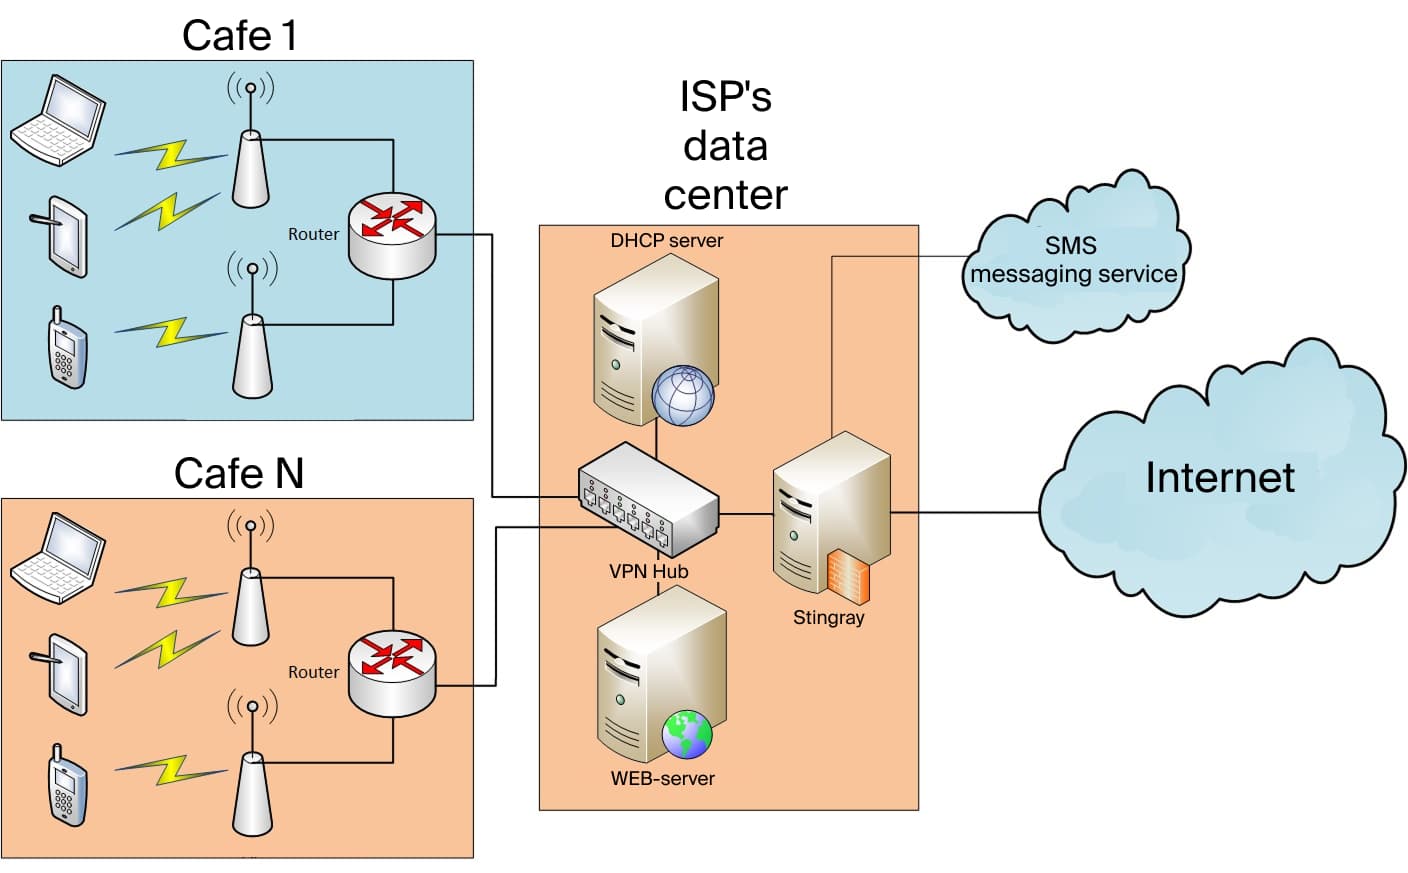
The sequence of operations under this scheme:
- A subscriber device (smartphone, tablet, or laptop) connects to the establishment’s Wi-Fi router (the free network);
- The Wi-Fi router requests a new IP address from the operator’s DHCP server;
- Upon issuing a new IP, the DHCP server calls a shell script and sends data to the Wi-Fi router;
- The shell script activates the whitelist service and a restricted-access tariff on the Stingray DPI for the issued IP;
- The web server receives a request for the welcome page; the subscriber activates the browser and navigates to any URL;
- The web server receives a request for the identification page (and checks the cookie); the subscriber enters their phone number and clicks “get access code”;
- The web server receives the access code request, generates a random number, and sends it to the subscriber’s phone via the external service; the subscriber enters the code in the form and clicks “confirm”;
- The web server receives the access code confirmation request; if the code is correct, it calls a shell script to remove the whitelist service and set the Wi-Fi access tariff, sets a cookie in the browser, and redirects to the originally requested URL.
Equipment Configuration
To implement the scheme, the operator’s equipment must be configured: the DPI system, the DHCP server, and the web server.
DPI System Configuration
- Use the protocol class description file txt
http    cs0
https    cs0
dns    cs0
default    cs1
- Convert and copy from the source archive to the DPI server:
cat protocols.txt|lst2dscp /etc/dpi/protocols.dscp
htdocs/wifi/.script to /home/fastdpi/
- Create the tariff file default_policing.cfg for Wi-Fi internet access at 10 Mbit:
htb_inbound_root=rate 10mbit
htb_inbound_class0=rate 1mbit ceil 10mbit
htb_inbound_class1=rate 1mbit ceil 10mbit
htb_inbound_class2=rate 8bit ceil 10mbit
htb_inbound_class3=rate 8bit ceil 10mbit
htb_inbound_class4=rate 8bit ceil 10mbit
htb_inbound_class5=rate 8bit ceil 10mbit
htb_inbound_class6=rate 8bit ceil 10mbit
htb_inbound_class7=rate 8bit ceil 10mbit
htb_root=rate 10mbit
htb_class0=rate 1mbit ceil 10mbit
htb_class1=rate 1mbit ceil 10mbit
htb_class2=rate 8bit ceil 10mbit
htb_class3=rate 8bit ceil 10mbit
htb_class4=rate 8bit ceil 10mbit
htb_class5=rate 8bit ceil 10mbit
htb_class6=rate 8bit ceil 10mbit
htb_class7=rate 8bit ceil 10mbit
- Create the tariff file captive_portal_hard.cfg for blocking internet access together with the whitelist:
htb_inbound_root=rate 256kbit
htb_inbound_class0=rate 8bit ceil 256kbit
htb_inbound_class1=rate 8bit ceil 8bit
htb_inbound_class2=rate 8bit ceil 8bit
htb_inbound_class3=rate 8bit ceil 8bit
htb_inbound_class4=rate 8bit ceil 8bit
htb_inbound_class5=rate 8bit ceil 8bit
htb_inbound_class6=rate 8bit ceil 8bit
htb_inbound_class7=rate 8bit ceil 8bit
htb_root=rate 256kbit
htb_class0=rate 8bit ceil 256kbit
htb_class1=rate 8bit ceil 8bit
htb_class2=rate 8bit ceil 8bit
htb_class3=rate 8bit ceil 8bit
htb_class4=rate 8bit ceil 8bit
htb_class5=rate 8bit ceil 8bit
htb_class6=rate 8bit ceil 8bit
htb_class7=rate 8bit ceil 8bit
- Configure the whitelist service:
cp_server=yoursite.com/welcome.php
DHCP Server Configuration
- Configure remote command execution via SSH.
- Set a trigger for issuing a new IP:
ssh dpi_user@dpi_host «/home/fastdpi/_add_captive_portal.sh »
Web Server Configuration
- Configure remote command execution via SSH.
- Configure the Apache configuration, example in the archive’s conf/ directory:
- In conf.d/php.ini, move/add settings from the example conf/php.ini
- Enable the conf file
- Set DocumentRoot to /var/www/html/htdocs/wifi/
- Copy htdocs/ to /var/www/html
- Edit /var/www/html/htdocs/wifi/.script/remove_captive_portal.sh
- Edit /var/www/html/htdocs/wifi/request.php, specifying the USER and PASSWORD for the SMS sending service
Implementing user identification with this scheme makes it possible to solve several tasks simultaneously:
- Provide visitors with free internet access, thereby increasing their loyalty and satisfaction;
- Comply with the governmental requirements and avoid fines;
- Display advertising and information about the establishment’s marketing promotions on the authorization page;
- Maintain visitor statistics for further analysis in order to improve service quality.
For more detailed information about the user identification feature of the Stingray DPI system and its other capabilities, please contact VAS Experts specialists.